Splayed legs and curled toes are two of the most common issues with newborn chicks but not to worry they are some of the simplest problems to fix. Using simple household items, within a week, your chick can be back up and walking unimpeded.

What Are Splayed Legs
Simply put splayed legs (also known as spraddle leg) is the legs slide outward from the chicks center line. Meaning the chick is not able to support his/her body weight and will often fall forward or be unable to stand. If not treated early the chick becomes unable to access food and water.
Splayed legs happen as a result of two possible conditions: The first during incubation. The thought is that not enough moisture is present preventing proper development. The second is due to slippery surfaces after hatching. Smooth surfaces such as cardboard or newspaper on the coop floor prevents the chick from properly gripping and gaining the coordination development needed at this tender age. To prevent splayed legs early on (if you hatch your own) make sure the coop floor has pine shavings, hay, or sand to provide a adequate surface for the chicks to grip while walking.

How To Fix Splayed Legs
Fixing splayed legs is done with everyday household items. We tested two different methods and found success with only one. We'll show you step by step how within a week our chick was back up and walking.
Method One: You will need
*plastic straw or roll up a piece of paper and tape in a tube shape.
*rubber band or hair tie
*pair of scissors
- Gently hold the chick in your hand on its back with its feet facing you. Place the straw or paper tube between its legs, measure and mark for appropriate length. Remember the chicks legs are splayed outside of their normal positioning which means they will need to be pulled in. It is better to start off a bit looser and then shorten the distance as the week progresses. This avoids putting too much stress on the chicks legs.
- Cut the tube to length and thread the rubber band/elastic through the tube.
- Gently holding the chick again (you will most likely need two people - one to hold and the other to attach the brace) Slide each loop of the rubber band onto the chicks legs.
- Position the rubber band loops just above the knee joint - careful not to place on the joint itself.
Why we didn't like this method
We found that the chick wouldn't walk at all using the rubber band method. At first, we thought maybe she was just getting used to the brace. After several hours we took the brace off and noticed the rubber band was too tight and cut into her legs. Thankfully no longterm damage was done but because we couldn't accurately control the pressure the rubber band exerted we tried a different method.

Method Two: You will need
*pair of scissors
*bandaid
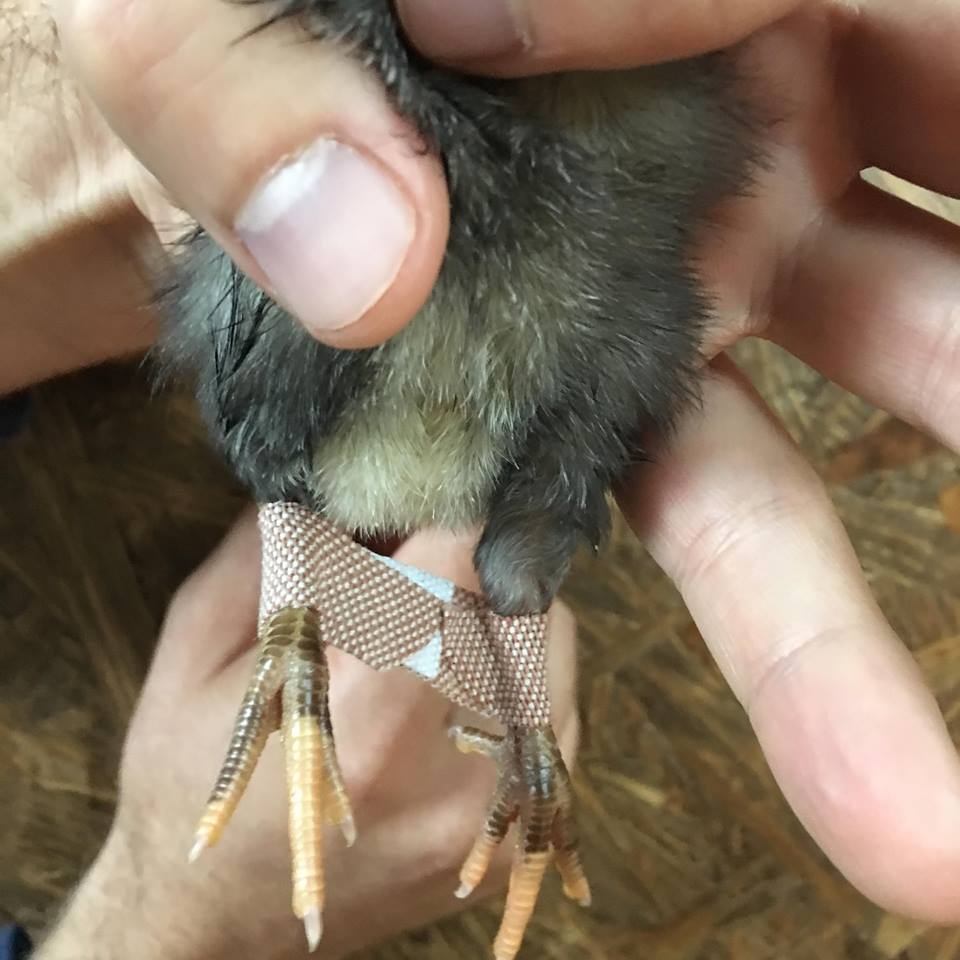
- Start off by cutting the bandaid in half lengthwise.
- Next have someone gently hold the chick on its back with its legs facing up towards you.
- After unwrapping the bandaid place one sticky end on one of the legs just above the knee joint. Close the bandaid meeting just before the padded center.
- Pull the other leg in slightly and wrap the second side of the bandaid around its other leg. Close to a distance that brings the chicks legs in line under its chest center.
- *If the chicks legs are extremely splayed start of with a wider brace and slowly bring in throughout the week.
Why we loved this method
The soft padding of the bandaid and wideness of the strip allow the chick to move a bit more freely although incredibly awkwardly until it regains its proper positioning. We also noticed she was much more comfortable standing up. Unlike the straw method, the bandaid doesn't cut into the chicks legs.


Splayed Leg Fix Observations
*One the first day, after switching to the bandaid brace, we noticed she had a bit of trouble standing up and moving around. This is to be expected. Make sure food and water is in a location that your chick can easily access without moving too much.
*Make sure your chick is separated from the flock for the duration of the fix. We moved out chick into the house in a moving box with pine shavings on the bottom. (Just a word of caution it can get smelly) Ensure your chick has plenty of water, food, and warmth. Keeping your chick warm is paramount. This can be done using a heat lamp or placing the box in a warm location with dishtowels or rags inside for extra warmth.
*After the first day we noticed she was waddling a bit but had a tendency to fall forward without being able right herself. Keep a close eye on your chick to ensure they can get back up or help them when they can't.
*We changed the bandaid every two days.
*The entire process took about a week. After which we removed the bandaid and observed her for another 12 hours to ensure she could stand and move freely. If all is okay then bring your chick back down to its flock. We watched our chick for about 30 minutes to make sure she was not rejected by the flock and could also sufficiently access food and water on her own.
**If when you bring your chick back to the coop and your chick continues to fall over then start the process over again. It can take up to two weeks.

What Are Curled Toes
This particular chick also had curled toes which is a condition possibly occurring as a result from unfavorable positioning in the egg. Curled toes is when the chicks is unable to spread out their toes preventing the chick from walking correctly or bearing weight on that foot. They become unbalanced. Paired with splayed legs our chick was in rough shape.

How To Fix Curled Toes
Curled toes can be a little tricky to correct in conjunction with a splayed leg brace. Hopefully you won't have to address both problems at once, but if you do, they can safely be done at the same time with a close watch.
You Will Need
*a thin piece of cardboard (such as a notebook back) or thick piece of paper such as cardstock
*scissors
*standard tape - do not use a heavy tape such a duct tape and/or packing tape. Masking tape will also work.
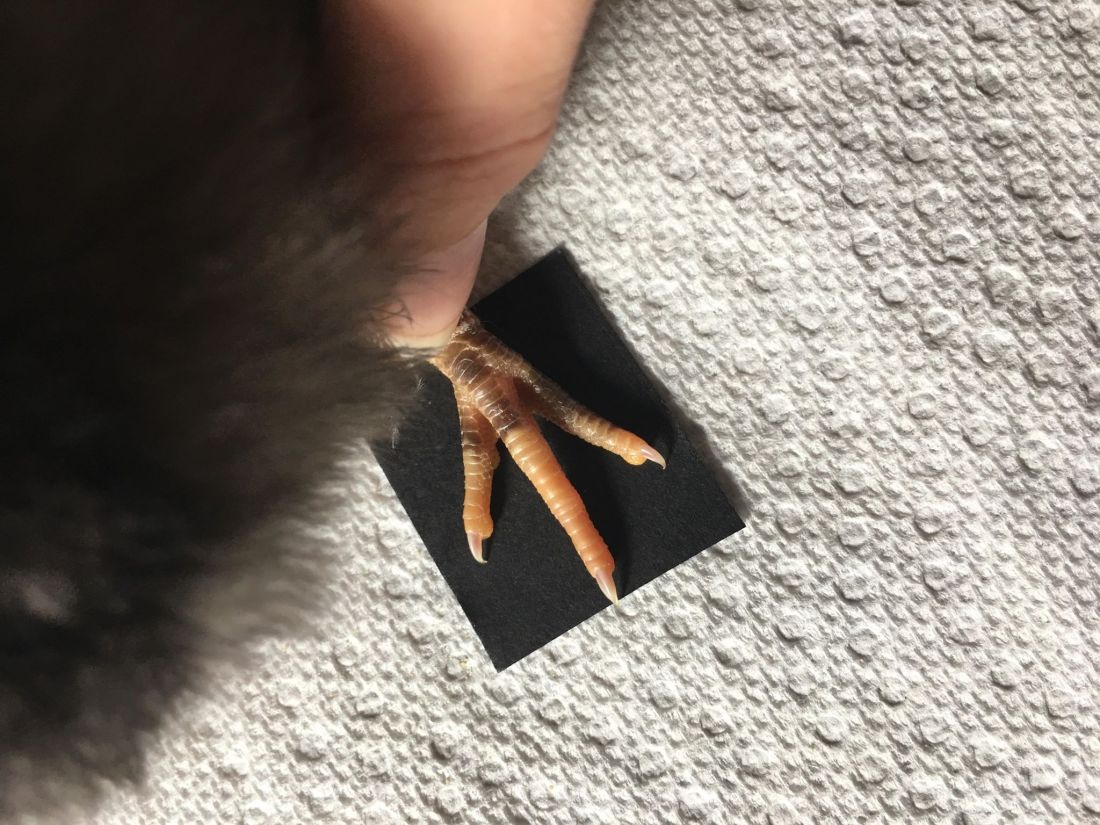
- Start off by cutting the thin cardboard or cardstock into two small squares just slightly bigger than the chicks foot when pressed flat (uncurl the toes to measure correctly) - these are the chicks shoes.
- Once you have your one or two shoes gently hold the chick in a standing position and place a shoe under the foot one at a time.
- Uncurl the toes and carefully place a piece of tape over the entire foot making sure to press down between each toe to ensure the shoe will not come off. We also recommend wrapping the tape around and under the edges of the shoe. You may need more than one piece of tape to adhere strongly enough to the shoe.
- That's it. The entire process will take about 24 to 48 hours to correct.

Curled Toe Correction Observations
*The entire process takes 24-48 hours. After the shoe has been removed observe for 12 hours to ensure your chicks toes are appropriately positioned. If not, repeat the process.
*The shoes will need to be changed out at a minimum every two days. This is to prevent any infection that might occur from feces getting trapped next to the foot from the tape.
*We noticed our chick kept slipping so we opted to correct one foot at a time. This means only placing a shoe on one foot until corrected and then addressed the second foot.
*Keep a close eye on your chick as her movement will be impaired.
*Make sure you keep your chick separated during the correction. See above under Splayed Leg Fix Observations for how to go about separating your chick successfully.
Why Fix Splayed Legs and Curled Toes
If you have hatched your own chicks it makes a lot of sense. You have already invested a lot of time, resources, and energy into its being. If you have bought your chicks we understand the thought of culling. We however noticed that the problem is quite common and the fix to easy and cost effective that it makes more sense to do the fix yourself rather than spending the money on new chicks.
Thanks for this! We have had great success with the curled toes, now working on the splayed legs. Our poor guy looks much like yours, and had been trapped in his shell requiring our help. But he seems quite happy, hopefully he makes it though these rough times.